This year I think I did most of my Christmas shopping online. It's also usually my preferred method of getting other gifts and various things year-round.
I know some people out there like to shop in the stores because they don't think internet retailers are that much more affordable, or maybe because they think shipping the item alone will cost an arm and a leg. I am here to say, or rather, type, that Overstock.com really doesn't fall into either of those catagories!
I know this from oh so personal experience. When looking for a nice wedding band for my husband just last year and earlier this year we looked ALL over. We looked in jewelry stores, both online and in person, and any other possible place else we could think of. The best ring we found was in Overstock's selection of Wedding Rings. The band we ended up choosing looks great on him, and more importantly really stands up to being worn by someone who works with his hands a lot. We had such a pleasant experience shopping for and purchasing that ring that Overstock is now one of the first places we always look online when shopping for just about anything.
When looking for a gift for my parents this year, I spent a lot of time online just looking for something that they will both enjoy, of course I looked at Overstock.com. This site has low prices on just about anything you could be looking for, and what's best is that the entire order ships for just $2.95, no matter how big your order may be.
I can't say what I did order for my parents because it's not Christmas yet, and I don't want to spoil it. :)
I can tell you that I did look in Bedding & Bath and Bedding Ensembles for their gift initially.
I am a big fan of Gift Baskets. All of the themed items in a basket (or some other creative container) wrapped up in cellophane just looks so nice and presentable! I definitely considered some of these when shopping for a certain man in my life. There are more than just the traditonal options here, Overstock also has dinner of the month, dinner and movie of the month and pasta of the month gift options. How fun is that!?
Overstock.com will also ship certain items in time for Christmas if you order by noontime EST on the 23rd. Just look for the red gift box below an item on the website to know what will make it home in time.
And as a nice holiday time bonus, Overstock would like to offer my readers a 10% discount on all items* using the code 121745 at checkout. The code doesn't expire, however is only good once, so make sure you order everything you need!
For those interested in purchasing electronics there is also something special for you. Use promo code 202234 to get free shipping.
*The 10% discount does not apply for movies, books or electronics
All the ideas and opinions expressed are my own. No monetary compensation was received for doing this post, however, I was provided with a discount code.
Wednesday, December 22, 2010
Monday, December 20, 2010
Lime Meltaways
You know the hard thing about not writing my blog posts soon after making a recipe? The problem is that I look on my camera and occasionally see something tasty I made and can't remember for the life of me where I put the dang recipe.
I have a nice collection of recipe books (most of them being dessert or chocolate oriented because, let's get straight to the point, dessert is almost always my favorite part of a meal.) I also have a box of recipe cards and small clippings. Then, there is my recipe binder. This is something I started waaaayyyy back in my sophmore year of high school. I took a foods class and the teacher had us keep a folder with the recipes we made in the class. I thought this was a wonderful way to keep track of all the recipes I print out. Let's face it, I print out lots of recipes. So my recipe folder eventually turned into a recipe binder, which has just somewhat recently been upgraded to a larger binder.
I do keep my recipe binder organized. I used every page divider I could find in the house. I think the largest section is devoted to recipes I would like to try. After that, desserts and other treats definitely takes the cake.
Anyways, let's get focused now. I got up early this morning while my husband got ready for work. I am a morning person, although you could probably never tell by how hard it is for me to wake up sometimes. I decided long ago that getting up early helps me make sure I get things around the house taken care of because *this* is when I am the most productive, by far. So I ate some breakfast, checked my email and here we are. Found my camera and went back into the memory looking for a recipe to write about, today, it's going to be Lime Meltaways.
Mine were actually more like Key Lime Meltaways, but regular, plain 'ol limes will work just fine for this application. Hubby and I stumbled upon a key lime tree and gathered about half a dozen to a dozen or so. I juiced lots of them for the recipe, and let me tell you what a pain it was! I didn't even get half of the juice I needed, but luckily, I have key lime juice in the fridge. I have been able to find it in stores with the regular lime and lemon juice.
These cookies were worth the work. As the name states, they seem to just melt away in your mouth. I think I might try the recipe with lemon juice sometime. Yummy!

Lime Meltaways
(Recipe slightly adapted from marthastewart.com)
12 tbl. unsalted butter, room temperature
1 c. powdered sugar, divided
finely grated zest of 2 or 3 limes
2 tbl. lime juice
1 tbl. vanilla
1 3/4 c. plus 2 tbl. all purpose flour (this is 2 c. minus 2 tbl. if you want to look at it differently)
2 tbl. cornstarch
In a mixer bowl, whisk together the butter and 1/3 c. sugar until nice and fluffy. Add in the zest, lime juice and vanilla, beat again until nice and fluffy.
In another bowl, mix together the flour and cornstarch (or just add it to the butter mixture like I did) and add to the butter mixture. Beat on a lower speed until everything is nice and combined.
Divide the dough into two equal portions. Roll each portion into a 1 1/4inch log in a piece of parchment paper. Stick the logs in the fridge for at least an hour, up to overnight to chill and firm up.
Preheat the oven to 350 degrees and line a couple cookie sheets with parchment, or lightly grease with nonstick spray, or even use a silpat baking mat (so many options!!). Take one of the logs from the fridge, remove the parchment and cut into 1/8 inch thick pieces. Place the pieces on the baking sheet about an inch apart- these shouldn't spread too much while baking. Then do the same with the other log of cookie dough.
Bake until they are just turning golden around the edges, between 5 to 10 minutes. Keep an eye on them, because it can happen fast. Move the cooked cookies to a baking rack to cool slightly. Once they are all on the rack, it's time to dust them.
Put the remaining 2/3 c. powdered sugar into a resealable sandwich bag and place a few cookies at a time into the bag and toss gently to coat. Put the coated cookies back on the rack and repeat until all of the cookies have a nice dusting of sugar. Enjoy!!
Linked up with:
- Tuesday Night Supper Club at Fudge Ripple
- Tuesday at the Table at All The Small Stuff
- Foodie Friday at Designs By Gollum
- Countdown to 2011 at Finding Joy in my Kitchen
Monday, December 6, 2010
German Chocolate Cake
Boy, has it been a while since I posted! Life got busy fast, all starting with Thanksgiving. A few weeks ago, hubby and I wanted to have a German-themed dinner. We had homemade brats as the entree, and I made a delicious German chocolate cake, but I don't know that this cake is actually of German, origin, though. What I do know is that I do not like coconut. And it's not just a texture thing, the flavor just doesn't jive with me. Lots of people do like it, and I got RAVE reviews on the cake.
You'll notice that the recipe makes 3 9-inch rounds of chocolate cake, but my finished product is 2 layers. Well, I cut the frosting to 2/3's so I could have one cake layer for myself. Yum!
I have to say, even if you don't like coconut, you should at least use the cake portion of this recipe, because it is divine! I was eating it without frosting of any kind. I even found myself returning to the kitchen for a piece of it! Yummy!!

5 eggs
1 1/2 tsp. vanilla extract
Preheat the oven to 350 degrees. Butter and flour 3 8- or 9-inch round cake pans, line bottoms with parchment.
Melt the chocolate either in the microwave, slowly, or in a double boiler on the stove. In another bowl, sift together the flour, cocoa, baking powder, baking soda and salt. In yet another bowl, combine the coffee and the buttermilk.
Now, in the bowl of a stand mixer, beat the butter until it is nice and creamy. Add in the sugar and beat until nice and fluffy. Beat in the eggs, one at a time. Make sure the first is completely incorporated before adding in another. Scrape down the sides of the mixer bowl and add in the vanilla, mix.
Mix in the flour mixture and the buttermilk mixture, alternatively, starting and ending with the flour mixture. (1/3 flour mixture, half buttermilk mixture, 1/3 flour, half buttermilk, 1/3 flour). Mix ONLY until everything is incorporated. Slowly mix in the melted chocolate.
Divide the batter among the 3 cake pans, and smooth the tops out. Bake for 30-35 minutes, or until a cake tester comes out clean. Let cool on wire racks.
Frosting:
1 1/4 c. pecans
1 c. granulated sugar
1 c. evaporated milk
3 egg yolks, slightly beaten
1/2 c. unsalted butter, cut into pieces
1 1/2 c. flaked coconut
1/2 tsp. vanilla extract
Preheat the oven to 350 degrees. Place the pecans on a baking sheet and bake just until you can smell them. Don't leave the immediate area because they can and will burn. Burnt pecans are not tasty. Coursely chop the toasted pecans.
In a medium saucepan, combine the sugar, milk, egg yolks and butter. Cook over medium heat, stirring constantly. When the mixture begins to boil and thicken, remove from the heat and mix in the pecans, vanilla and coconut. Let it cool until spreadable, then spread onto the cooled cake. Enjoy!
You'll notice that the recipe makes 3 9-inch rounds of chocolate cake, but my finished product is 2 layers. Well, I cut the frosting to 2/3's so I could have one cake layer for myself. Yum!
I have to say, even if you don't like coconut, you should at least use the cake portion of this recipe, because it is divine! I was eating it without frosting of any kind. I even found myself returning to the kitchen for a piece of it! Yummy!!

German Chocolate Cake (serves: a lot!)
(recipe from Joy of Baking)
Cake:
4 ounces semisweet chocolate, chopped
2 1/4 c. cake flour
3/4 c. unsweetened cocoa powder
1 1/2 tsp. baking powder
1/2 tsp. baking soda
1/2 tsp. salt
1 c. hot coffee or boiling water
1 c. buttermilk
1 1/4 c. unsalted butter, room temperature
2 1/4 c. granulated sugar5 eggs
1 1/2 tsp. vanilla extract
Preheat the oven to 350 degrees. Butter and flour 3 8- or 9-inch round cake pans, line bottoms with parchment.
Melt the chocolate either in the microwave, slowly, or in a double boiler on the stove. In another bowl, sift together the flour, cocoa, baking powder, baking soda and salt. In yet another bowl, combine the coffee and the buttermilk.
Now, in the bowl of a stand mixer, beat the butter until it is nice and creamy. Add in the sugar and beat until nice and fluffy. Beat in the eggs, one at a time. Make sure the first is completely incorporated before adding in another. Scrape down the sides of the mixer bowl and add in the vanilla, mix.
Mix in the flour mixture and the buttermilk mixture, alternatively, starting and ending with the flour mixture. (1/3 flour mixture, half buttermilk mixture, 1/3 flour, half buttermilk, 1/3 flour). Mix ONLY until everything is incorporated. Slowly mix in the melted chocolate.
Divide the batter among the 3 cake pans, and smooth the tops out. Bake for 30-35 minutes, or until a cake tester comes out clean. Let cool on wire racks.
Frosting:
1 1/4 c. pecans
1 c. granulated sugar
1 c. evaporated milk
3 egg yolks, slightly beaten
1/2 c. unsalted butter, cut into pieces
1 1/2 c. flaked coconut
1/2 tsp. vanilla extract
Preheat the oven to 350 degrees. Place the pecans on a baking sheet and bake just until you can smell them. Don't leave the immediate area because they can and will burn. Burnt pecans are not tasty. Coursely chop the toasted pecans.
In a medium saucepan, combine the sugar, milk, egg yolks and butter. Cook over medium heat, stirring constantly. When the mixture begins to boil and thicken, remove from the heat and mix in the pecans, vanilla and coconut. Let it cool until spreadable, then spread onto the cooled cake. Enjoy!
I have linked up with the following parties:
- Potluck Sunday at Mommy's Kitchen
- Tuesdays at the Table at All The Small Stuff
- Tempt My Tummy Tuesday at Blessed with Grace
- Hearth & Soul Hop vol. 26 at A Moderate Life
- Tuesday Night Supper Club at Fudge Ripple
- Tasty Tuesday at Balancing Beauty and Bedlam
Sunday, November 21, 2010
Bread Bowls
Recently a friend of mine and I had lunch at La Bou. I really like this place. I wish there was one closer to me. Their dill sauce is simply amazing. More on that when I figure out how to make it for myself!
She had a salad and I had a bread bowl filled with this tasty spicy thai chicken soup.
I had never had a bread bowl before, and after having this one I KNEW I had to make them at home. They are too delicious and fun NOT to make at home.
My husband was going to make his delicious chili, and what a perfectexcuse reason to make bread bowls!
I first searched my cookbooks for bread bowl recipes. I know there has got to be some basic bread recipe out there that you can form into this round loaf, but not being that experienced in bread making, I wanted to make sure I found a recipe that was suited for bread bowls. Hard on the outside and soft in the center.
The bread itself doesn't have a ton of flavor, but that's what the soup (or chili!) is for. If you want to add flavor to the bread, go for it. Try some dried spices.
I divided the dough into 6 portions (per lots of the reviews) and they were the perfect size for a dinner serving of chili. Divide into 8 if you want them a bit smaller.

Bread Bowls (makes 6 bowls)
(adapted this recipe from allrecipes.com)
2 (.25oz) packages active dry yeast (4 1/2tsp total)
2 1/2 c. warm water
1 tsp. salt
1 tbl. sugar
2 tbl. olive oil
7 c. all purpose flour
In the bowl of a stand mixer, dissolve the yeast in the water. Let sit until nice and creamy looking (about 10 min). Add the salt, sugar, oil and 4 cups of the flour and mix with the paddle attachment until everything is thoroughly combined. Add the remaining flour, 1/2 cup at a time, scrape down the bowl as necessary.
Switch out the paddle attachment for a dough hook and knead until the dough comes together and is smooth and elastic.
Put the dough in a lightly oiled bowl, move it around to cover with oil. Cover the bowl with a towel or a piece of plastic and set in the oven along with a large cup of hot water (to provide steam). Let rise for 40 minutes, or until doubled.
Punch dough down and divide into 6 even portions. Lightly grease two cookie sheets and sprinkle lightly with cornmeal. Roll the dough pieces into balls and set them apart on the cookie sheets. Cover again with towels and back into the oven. Reheat the cup of water if it's not hot anymore. Let rise 35 minutes or so, or until they have risen to about twice their original size.
Bake in a 400 degree oven for 25-35 minutes or until they have turned a lovely golden. Allow the bread to cool on a baking rack. Slice off the top 1/2inch of the bread, or cut an upside down cone out of the top. Pull out all of the insides but about an inch of shell. Fill with your soup or chili. Enjoy!
Linked up with:
She had a salad and I had a bread bowl filled with this tasty spicy thai chicken soup.
I had never had a bread bowl before, and after having this one I KNEW I had to make them at home. They are too delicious and fun NOT to make at home.
My husband was going to make his delicious chili, and what a perfect
I first searched my cookbooks for bread bowl recipes. I know there has got to be some basic bread recipe out there that you can form into this round loaf, but not being that experienced in bread making, I wanted to make sure I found a recipe that was suited for bread bowls. Hard on the outside and soft in the center.
The bread itself doesn't have a ton of flavor, but that's what the soup (or chili!) is for. If you want to add flavor to the bread, go for it. Try some dried spices.
I divided the dough into 6 portions (per lots of the reviews) and they were the perfect size for a dinner serving of chili. Divide into 8 if you want them a bit smaller.

Bread Bowls (makes 6 bowls)
(adapted this recipe from allrecipes.com)
2 (.25oz) packages active dry yeast (4 1/2tsp total)
2 1/2 c. warm water
1 tsp. salt
1 tbl. sugar
2 tbl. olive oil
7 c. all purpose flour
In the bowl of a stand mixer, dissolve the yeast in the water. Let sit until nice and creamy looking (about 10 min). Add the salt, sugar, oil and 4 cups of the flour and mix with the paddle attachment until everything is thoroughly combined. Add the remaining flour, 1/2 cup at a time, scrape down the bowl as necessary.
Switch out the paddle attachment for a dough hook and knead until the dough comes together and is smooth and elastic.
Put the dough in a lightly oiled bowl, move it around to cover with oil. Cover the bowl with a towel or a piece of plastic and set in the oven along with a large cup of hot water (to provide steam). Let rise for 40 minutes, or until doubled.
Punch dough down and divide into 6 even portions. Lightly grease two cookie sheets and sprinkle lightly with cornmeal. Roll the dough pieces into balls and set them apart on the cookie sheets. Cover again with towels and back into the oven. Reheat the cup of water if it's not hot anymore. Let rise 35 minutes or so, or until they have risen to about twice their original size.
Bake in a 400 degree oven for 25-35 minutes or until they have turned a lovely golden. Allow the bread to cool on a baking rack. Slice off the top 1/2inch of the bread, or cut an upside down cone out of the top. Pull out all of the insides but about an inch of shell. Fill with your soup or chili. Enjoy!
Linked up with:
- Sunday Recipe Swap at Remodelaholic
- Tuesdays at the Table at All the Small Stuff
- Tuesday Night Supper Club at Fudge Ripple
- Delicious Dishes at itsablogparty.com
- Dr. Laura's Tasty Tuesday at whoislaura.com
- Hearth & Soul Hop vol. 24 at A Moderate Life
- Tasty Tuesday at A Beautiful Mess
- Tempt My Tummy Tuesday at Blessed With Grace
- Tasty Tuesday at Balancing Beauty and Bedlam
Sunday, November 14, 2010
Cake Batter Ice Cream
I know, I know. It's cold outside. But big time ice cream lovers will eat this stuff rain or shine!
On a trip to Wisconsin in September for a wedding, Hubby and I stopped at a cute little cafe and tried their cake batter ice cream. It was delicious!
Let me explain. Who doesn't like licking the bowl clean when making cake? I know that some people frown on it because there is raw egg in the batter.
So here is the perfect solution. The egg used in this recipe is all cooked. And yet, when served, it has the same creaminess that cake batter does, and the SAME taste. It's great. I think next time I'm going to try a chocolate version. Or maybe just mix cookie crumbs in it.
Did I mention that a certain vanilla wafer compliments this ice cream wonderfully? Try it out! This would be a fun twist for a child's birthday. Top with some sprinkles and a birthday candle and ta-da!

Cake Batter Ice Cream
(recipe from allrecipes.com)
1 c. milk (I used low fat and none could be the wiser!)
1/2 c. granulated white sugar
2 egg yolks, beaten
1 tsp. vanilla extract
2 c. heavy whipping cream
1 c. yellow or french vanilla cake mix
Whisk together all of the ingredients in a medium saucepan until everything is well blended. Turn the heat to medium-low and cook until the mixture reaches 160 degrees F, keep whisking to make sure nothing on the bottom burns. The mixture will be nice and thick when it reaches the right temperature. Remove ice cream base from the heat and refrigerate until it's well chilled. Make sure to press a piece of plastic onto the surface of the base to prevent a skin from forming.
Once chilled, pour the ice cream base into your ice cream machine per the directions of the manufacturer. Stick in a freezer safe container and freeze for a couple of hours to firm up.
Note: This ice cream freezes up firm, so take out of the freezer 10-15 minutes before youy plan to serve it.
I linked this recipe up at:
- Mouthwatering Monday at A Southern Fairytale
- Tuesdays at the Table at All the Small Stuff
- Tuesday Night Supper Club at Fudge Ripple
- Delicious Dishes at itsablogparty.com
- Dr. Laura's Tasty Tuesday at whoislaura.com
- Tasty Tuesday at A Beautiful Mess
- Hearth and Soul Hop vol.23 at A Moderate Life
- Tempt My Tummy Tuesday at Blessed With Grace
- Whatcha Makin Wednesday at Scrapaddict4sure
- Foodie Friday at Designs by Gollum
Sunday, November 7, 2010
Apple Chips
Tis the season for apples! So many varieties appear at the grocery store. Tourist spots like Apple Hill get a mad rush of people that loves apples (or so I hear).
Hubby's parents dropped off a couple paper grocery sacks of apples from their yard. Wanting to preserve them, I stumbled upon this recipe by Food Network's Alex Guarnaschelli.
Yes, we do have a food dehydrator. I had no problem drying these out in the oven since it only gets up to 200 degrees F. Plus, I don't much care for cleaning the dehydrator's racks.
These apple chips were really easy to make. The hardest part is waiting for them to soak in the sugar water then wait for the oven to cool off and them to be ready. Good flavor, and good color all remains. I'm not sure how it would be with less sugar, but with apples on sale, it couldn't hurt to try!

Apple Chips
(recipe by Alex Guarnaschelli)
2 cups water
1 1/2 cups sugar
2 or 3 lemons
2 small- medium apples washed and tried(I used one small and one medium, filled my cookie sheets perfectly)
In a small pot, bring the water and sugar to a slow boil, stir to dissolve the sugar. Remove from heat and let it cool.
Core the apples and then slice them thinly with a mandoline. Leave those skins on! It adds a nice pop of color to the finished chip.
As you slice the apples, dribble some lemon juice over them to keep from browning (oxidizing). Once they are all sliced and the sugar syrup has cooled off, pour the syrup into a baking dish (I used one a little smaller than my 9x13in. Place the apples in gently, make sure they are covered by the sugar syrup. They will have to overlap, that's fine, just make sure there is syrup between the pieces.
Let them sit for a few hours- or overnight.
The next morning, preheat the oven to 200 degrees F. Line 2 cookie sheets with parchment paper. Very lightly dry the apple slices on a paper towel then lay them out in one layer- not touching. Bake for 1 hour, or until crispy. Turn off the oven and leave the apple chips in there until everything has cooled off. This will ensure they have dried out.
Store in an airtight container, or just eat them! Enjoy!
This wonderful recipe is linked up at:
- Made By You Monday at Skip to My Lou
- Tuesday Night Supper Club at Fudge Ripple
- Delicious Dishes at It's a Blog Party
- Dr. Laura's Tasty Tuesday at WhoIsLaura.com
- Tasty Tuesday at A Beautiful Mess
- Tuesdays at the Table at All The Small Stuff
- Tasty Tuesday at Balancing Beauty and Bedlam
Monday, November 1, 2010
Best Tortellini Soup
I like to decide what is going to be for dinner as early into the day as possible. There is just something about being organized and prepared that I enjoy so much. There is also the fact that it takes some time to defrost whatever protien we will be chowing on.
So one morning I get a text from Hubby requesting tortellini soup. Not only that, but he already had a recipe in mind that was tried and true (from a friend at work). With the weather cooling off, soup sounds great. Not only that, but I haven't ever made this kind before and it looks great!
I did some internet searching for similar recipes, but honestly, none of them sounded as good as this one. And it sure was yummy. I forgot to take pictures because we dug right into the stuff. :)
Tortellini Soup
(modified by Stacia)
1 to 1 1/2 pounds bulk Italian sausage
1 onion, chopped
2 garlic cloves, minced
4 cups beef broth
2 cups water
1 1/2 tsp. italian seasoning
2 big carrots, half inch slice
1 14.5oz can diced tomatoes (with juice)
1 15oz can kidney beans, drained and rinsed
1 16oz package tortellini (mine were roasted chicken, but whatever flavor you want will be fine)
salt & pepper
In a large pot or dutch oven, cook the sausage and onion over medium to medium high heat until the onion has softened and the sausage is cooked through. Drain off as much fat as you can (or want).
Add the broth, water, italian seasoning and carrots. Bring everything to a slow boil and cook for about 10 minutes. Stir in the tomatoes and uncooked tortellini (mine were frozen at this point). Cook until the tortellini have cooked through. Season with salt and pepper as desired and serve up (garnished with parmesan if you're into that kind of thing)
Linked up with:
- Mouthwatering Monday at A Southern Fairytale
- Tuesdays at the Table at All The Small Stuff
- Tuesday Night Supper Club at Fudge Ripple
- Hearth and Soul Hop vol.21 at A Moderate Life
- Delicious Dishes at It's a Blog Party
- Dr. Laura's Tasty Tuesday at Who Is Laura
- Tasty Tuesdays at A Beautiful Mess
- Tempt My Tummy Tuesday at Blessed with Grace
Monday, October 25, 2010
Pepper Vinegar
Being a California girl, I wasn't really sure what pepper vinegar was when I first stumbled upon a recipe for it.
How did I stumble across a recipe for pepper vinegar? Well, in anticipation of planting a variety of hot pepper plants, I began searching for recipes to utilize them. Why grow 6 different hot peppers with no plans to USE any of them?
When I first found this recipe I was intrigued, to say the least. I looked up other versions of pepper vinegar. I remembered going to St. Louis for a couson's wedding and seeing a bottle of what must have been -pepper vinegar- in a Steak and Shake. Hmm...so these people were onto something that I wasn't.
These pepper recipes were part of why I started blogging when I did. I wanted to document recipes that I tried and made up. Some have been good, some have been not so good. But this pepper vinegar has been great.
Onto the recipe...

Wash, and sterilize in a hot water bath if you so desire, the bottles and lids (and a funnel).
Wash the peppers and let dry, or gently dry with a towel. Cut off the stem and slice in half (or in quarters if a half is too big to fit through the neck of the bottle).
Stuff the peppers into the bottle. You want them to all fit in nicely, but not too snug because otherwise, the vinegar won't be able to get around all of them. You can get creative here and put the peppers in different orders to make fun patterns. I found a chopstick was very handy in getting the peppers right where I wanted them. Make sure there is empty space in the neck above the peppers. This ensures they can all be covered completely with vinegar.
Warm up some vinegar. You have to estimate how much you'll need. If you are making several bottles, I recommend following the directions here on how he heated up the vinegar. Since I did one or 2 small bottles at a time, I put some vinegar in a glass liquid measuring cup and popped in in the microwave for 45 to 60 seconds.
Pour the vinegar into the bottles with the help of a funnel. Once the tops of the peppers are covered, oh so gently shake the bottle to release any air pockets. Fill up some more, but make sure to leave some head space in the top.
These little beauties need to sit away from direct sunlight for at least 2 weeks. Put them in a cupboard or in your fridge. I'm making some for Christmas gifts. Yum!
Linked up with:
How did I stumble across a recipe for pepper vinegar? Well, in anticipation of planting a variety of hot pepper plants, I began searching for recipes to utilize them. Why grow 6 different hot peppers with no plans to USE any of them?
When I first found this recipe I was intrigued, to say the least. I looked up other versions of pepper vinegar. I remembered going to St. Louis for a couson's wedding and seeing a bottle of what must have been -pepper vinegar- in a Steak and Shake. Hmm...so these people were onto something that I wasn't.
These pepper recipes were part of why I started blogging when I did. I wanted to document recipes that I tried and made up. Some have been good, some have been not so good. But this pepper vinegar has been great.
Hubby and I have put it on stuffed bell peppers and on pasta. There are definite plans to put some on pizza next time we make that too. It's peppery- that's for sure, but not as hot as you might think it should be since it has cayenne peppers in it. It's also vinegar-y (sp?), go figure. Perfect replacement for the bottled hot sauce we had sitting in the fridge. As you can see in one of my pictures, we dumped the hot sauce in favor of some pepper vinegar. The other bottles are those small wine bottles you find in the store in packs of 4. I love using those when a recipe calls for about a cup of wine- no need to open up a whole bottle!
Any bottle you want should work, so long as you can wash it well and the neck is wide enough to shove peppers through. Take also into consideration how well it pours. We found those wine bottles don't pour as easily as we would like. It's all worth it though. :)
This pepper vinegar needs to sit in the cupboard or the fridge for 2 weeks, ideally before use. This gives the vinegar time to absorb that yummy flavor. And now that the weather is starting to cool off (at least around my parts), it's time to figure out what to do with all of those last peppers before the cold destroys them! This recipe is perfect!
Of course, you could just go to the grocery store and grab some peppers there. Bring the bottle you plan to use (empty!) so you can get an idea of how many peppers you'll need.Onto the recipe...

Pepper Vinegar
(recipe from MostlyCajun.com)
Hot peppers (cayennes, serranos, jalapenos, etc.)
Distilled white vinegar (Try apple cider vinegar for a fun twist!)
bottles (clear is fun so you can see the peppers inside)
Wash, and sterilize in a hot water bath if you so desire, the bottles and lids (and a funnel).
Wash the peppers and let dry, or gently dry with a towel. Cut off the stem and slice in half (or in quarters if a half is too big to fit through the neck of the bottle).
Stuff the peppers into the bottle. You want them to all fit in nicely, but not too snug because otherwise, the vinegar won't be able to get around all of them. You can get creative here and put the peppers in different orders to make fun patterns. I found a chopstick was very handy in getting the peppers right where I wanted them. Make sure there is empty space in the neck above the peppers. This ensures they can all be covered completely with vinegar.
Warm up some vinegar. You have to estimate how much you'll need. If you are making several bottles, I recommend following the directions here on how he heated up the vinegar. Since I did one or 2 small bottles at a time, I put some vinegar in a glass liquid measuring cup and popped in in the microwave for 45 to 60 seconds.
Pour the vinegar into the bottles with the help of a funnel. Once the tops of the peppers are covered, oh so gently shake the bottle to release any air pockets. Fill up some more, but make sure to leave some head space in the top.
These little beauties need to sit away from direct sunlight for at least 2 weeks. Put them in a cupboard or in your fridge. I'm making some for Christmas gifts. Yum!
Linked up with:
- Friday Favorites at Simply Sweet Home
- Tuesdays at the Table at All the Small Stuff
- Tuesday Night Supper Club at Fudge Ripple
- Hearth & Soul Hop #20 at A Moderate Life
- Tempt My Tummy Tuesday at Blessed with Grace
- Mouthwatering Monday at A Southern Fairytale
- Foodie Friday at Designs By Gollum
Sunday, October 24, 2010
Strawberry Shortcake Scones
You remember my Strawberry Bread, don't you? You don't? Okay, go ahead and read it. I have time. :)
Back to my 2 containers of strawberries that needed use. I found a delicious looking recipe for Strawberry Shortcake Scones at Fancy Frugalista. Having a bunch of strawberries and the desire to expand my scone repertoire, these were perfect. I love that they use NO cream. Perfect since I didn't have any.
These are great, and definitely best fresh and warm. Yummy!
The recipe calls for strawberry juice. My strawberries weren't willing to give up much, even after a sprinkling of sugar. So I just used what I had and filled up the rest of the way with milk. It worked. They were great.
I halved the recipe for hubby and I, if you have quite a few people to feed, go ahead and make the full batch.

Strawberry Shortcake Scones
(recipe from Fancy Frugalista)
2 c. flour
2 tsp. baking powder
1/4 c. + 2 tbl. granulated sugar
1/2 tsp. salt
1/2 c. room tempterature butter, cubed
1 egg
1 tsp. vanilla
strawberry juice + milk to equal 1/3 cup. (half and half is ideal, but more milk than juice is just fine)
1/2 c. chopped strawberries (mix in some sugar and let sit to get juice)
Preheat your oven to 375 degrees. Grease a cookie sheet.
Mix together the first 4 ingredients. Then blend in the butter until it's pea sized.
In a small bowl, whisk together the egg, vanilla, juice and milk. Mix into the flour mixture just until moistened. Gently mix in the berries. Put the dough onto the cookie sheet and form into a 8-inch circle. Score into 6 to 8 slices and bake 25-30 minutes. I think you could also divide the dough into 6 to 8 pieces and put them on the cookie sheet and bake them that way. They may night take as long to bake, so keep an eye. Let cool a bit and enjoy!!
Linked up with the following awesome parties:
- Friday Favorites at Simply Sweet Home
- Tuesdays at the Table at All the Small Stuff
- Tuesday Night Supper Club at Fudge Ripple
- Tempt My Tummy Tuesday at Blessed with Grace
- Mouthwatering Monday at A Southern Fairytale
Sunday, October 17, 2010
Strawberry Bread
Strawberries were on sale cheap at one of our local grocery stores and I wanted to get a couple containers for strawberry shortcake. Unfortunately, the yellow cake I was planning to use as the cake molded. Like the day after we bought the strawberries.
So, with two containers of strawberries, it was time to get creative. I made strawberry shortcake scones (more on that later), cool and easy strawberry pie (that's dessert for tonight), and a lovely strawberry bread.
I found the recipe at allrecipes.com, but made so many changes that there isn't a whole lot linking it back to the original (which I don't have the link for anyways).
 I don't know about anyone else, but warm strawberries doesn't sound very good. However, it's time to get over that feeling and have some yummy bread. The bread is great warm, but also tasty at room temperature. It's incredibly moist and soft. Yum.
I left the nuts out of the recipe because hubby isn't a big fan of them in bread, but feel free to add some in if it's your sorta thing.

Strawberry Bread one 9x5inch loaf
1 1/2 c. all purpose flour
1 c. granulated sugar
sprinkle of cinnamon
1/4 tsp salt
1/2 tsp. baking soda
1/4 c. + 2 tbl. veggie oil (or try substituting applesauce- and let me know how it works!)
2 eggs, lightly beaten
1/2 tsp. vanilla
1 c. strawberries, pureed
1 c. strawberries, chopped
1/2-3/4 c. chopped pecans (optional)
Preheat the oven to 350 degrees. Grease and flour a 9x5inch loaf pan.
In a large bowl, stir together the flour, sugar, cinnamon, salt and baking soda. In a smaller bowl, blend together the oil, eggs, vanilla and pureed strawberries. Add the wet ingredients to the dry and stir just until everything is moistened. Gently fold in the chopped strawberries and pecans.
Pour the batter into the pan and bake for 45-50 minutes, or until a toothpick inserted near the middle comes out clean. Cool in the pan on a wire rack for about 10 minutes before turning the loaf out of the pan to cool the rest of the way. Slice and enjoy!!
Linked up with:
So, with two containers of strawberries, it was time to get creative. I made strawberry shortcake scones (more on that later), cool and easy strawberry pie (that's dessert for tonight), and a lovely strawberry bread.
I found the recipe at allrecipes.com, but made so many changes that there isn't a whole lot linking it back to the original (which I don't have the link for anyways).

I left the nuts out of the recipe because hubby isn't a big fan of them in bread, but feel free to add some in if it's your sorta thing.

Strawberry Bread one 9x5inch loaf
1 1/2 c. all purpose flour
1 c. granulated sugar
sprinkle of cinnamon
1/4 tsp salt
1/2 tsp. baking soda
1/4 c. + 2 tbl. veggie oil (or try substituting applesauce- and let me know how it works!)
2 eggs, lightly beaten
1/2 tsp. vanilla
1 c. strawberries, pureed
1 c. strawberries, chopped
1/2-3/4 c. chopped pecans (optional)
Preheat the oven to 350 degrees. Grease and flour a 9x5inch loaf pan.
In a large bowl, stir together the flour, sugar, cinnamon, salt and baking soda. In a smaller bowl, blend together the oil, eggs, vanilla and pureed strawberries. Add the wet ingredients to the dry and stir just until everything is moistened. Gently fold in the chopped strawberries and pecans.
Pour the batter into the pan and bake for 45-50 minutes, or until a toothpick inserted near the middle comes out clean. Cool in the pan on a wire rack for about 10 minutes before turning the loaf out of the pan to cool the rest of the way. Slice and enjoy!!
Linked up with:
- Tuesdays at the Table at All the Small Stuff
- Tuesday Night Supper Club at Fudge Ripple
- Hearth and Soul Hop vol. 19 at A Moderate Life
Friday, October 8, 2010
Chocolate Crinkle Cookies

This week at my internship worksite, someone brought in the staff pizza and cookies. I chose a huge chocolate crinkle cookie, and at that moment knew I had to make some of my own at home.
I searched and searched my cookbooks for a recipe to no avail. My mom makes something similar around Christmas time, but the recipe must be over at her house. Off to the internet I went. I searched "krinkle" and "crinkle" and came up with loads of recipes. Some included melted chocolate, some required refrigeration time, some had good reviews and some had mixed reviews. After looking at a few I knew that I wanted one that used cocoa powder instead of melted chocolate and preferred to find one that didn't require any refrigeration time because I prefer to start and finish a recipe in one standing.
Enter here the Williams-Sonoma website. I have a few of their cookbooks, of which I am very very pleased with. This recipe had great reviews (I love the recipe websites that let people review them. SOOOOO helpful!). And the weird thing is - I followed the recipe EXACTLY this time. Crazy, huh? They are delicious. Hubby even enjoys them in his lunch. Win-win! They are definitely going on my Christmas cookie list.

Chocolate Crinkle Cookies makes 24-30 cookies
(recipe from Williams-Sonoma)
1/2 c. powdered sugar (you may need just a bit more)
1 2/3 c. all purpose flour
1/2 c. unsweetened cocoa powder
1 1/2 tsp. baking powder
1/4 tsp. salt
1 stick unsalted butter, room temperature
1 1/4 c. granulated sugar
2 eggs
1/2 tsp. vanilla extract
Preheat the oven to 350 degrees and grease two cookie sheets.
Put the powdered sugar into a bowl and set aside- a cereal bowl works great for this.
In another bowl, mix together the flour, cocoa powder, baking powder and salt.
Now, in a large bowl, or the bowl of a stand mixer, beat together the butter and granulated sugar until it's nice and creamy. Add the eggs, one at a time, beating well after each addition. Mix in the vanilla.
Gently mix in the flour mixture until it's all combined.
Using a tablespoon, or a melon baller, scoop out the cookie dough and roll it into balls. Put the balls in the bowl of powdered sugar, a few at a time, and roll them around until completely coated. The powdered sugar does seem to stick better when the dough is cool. Place the powdered sugar covered cookie dough balls (they look like donut holes) on the cookie sheet, a couple inches apart and bake for 10 to 12 minutes until they have puffed and cracked.
Let them sit on the cookie sheet for just a moment, then move to a cooling rack to finish cooling. Enjoy!
I have linked up at:
- Mouthwatering Monday at A Southern Fairytale
- Tasty Tuesday at Balancing Beauty and Bedlam
- Tuesdays at the Table at All The Small Stuff
- Tuesday Night Supper Club at Fudge Ripple
- Hearth and Soul Hop vol. 18 at A Moderate Life
Wednesday, September 29, 2010
Apple Strudel Bread
Apples are coming back in season (or maybe they are just on sale where I live). The other day, Hubby bought a few Granny Smiths. I knew immediately that I wanted to make or bake SOMETHING with these apples. There wasn't enough for a pie, so that was out of the question for now. I began my search for recipes online. I think I must have found what I was looking for from my Better Homes and Gardens email list. I was looking at a bunch of their Fall recipes when I found one for Apple Strudel Bread. I followed the recipe exactly, except for a few minor changes.
First, I used all purpose flour instead of bread flour because it's what I have. It worked just fine.
Next, I used only 2 apples. I don't think it added up to the 3 cups the recipe asked for, but it worked well because..
Lastly, I only rolled out the dough to 17x14 inches because that's how big my largest cutting board is.
This bread is so delicious! A whole (huge) loaf has lasted me and the hubby several days, and I can safely say that I am not tired of it yet. Usuallu having something that many days straight will get me tired of it. Not this. I am not a big raisin fan, but I added them in anyways, and let me tell you that all of the lovely filling components go so well together with the lovely sweet yeast bread.
Oh, and that yeast bread. It's made in the bread machine! How much easier could that be?? You can certainly make it by hand, no doubt about that. But I love all of the free time this gave me.

Apple Strudel Bread
(recipe slightly adapted from bhg.com)
3/4 c. milk
1/3 c. butter, cut up
1 egg
3 1/4 c. all purpose flour
1/3 c. granulated sugar
3/4 tsp. salt
1 tsp. active dry yeast
3 tbl. butter, softened
2 med-large apples, peeled and thinly sliced
1/2 c. packed brown sugar
1/2 c. raisins
4 tsp. all purpose flour
1 tsp. ground cinnamon
optional glaze (I didn't think it was necessary): 3/4 c. powdered sugar + 1/4 tsp. vanilla + milk
Add the first seven ingredients to your bread machine in the order recommended by the manufacturer. Select dough cycle. When the cycle is over, punch down the dough and let it rest for 10 minutes.
Line a large cookie sheet or baking dish with foil. (I didn't line my cookie sheet with foil, and ended up with that delicious brown sugar goo all over the bottom of my oven.
On a lightly floured surface, roll out the dough to a rectangle (17x14 worked for me, but 24x12 would give you a bigger loaf). Brush with the softened butter.
To make the filling, mix together the apples, brown sugar, raisins, flour and cinnamon. Spoon the filling on the middle third of the dough, lengthwise. Another option is to shingle the apple slices all the way across and drizzle the sauce and raisins over that. Make sure to leave about 2 inches on either side so it can be sealed up.
Roll the whole thing up like you are making cinnamon rolls. I ended up just folding the top third over the apples, then the bottom third of the dough over that. Pinch all of the ends and place on your baking sheet/pan. Cover and let it rise in a warm place for about 45 minutes. Bake in a 350 degree oven for 30-35 minutes. Cool completely in the pan on a wire rack.
Mix together the glaze ingredients if desired. The amount of milk is up to you and how thin or thick you want the glaze to be. Drizzle over the bread once cooled.
Slice up and enjoy!!
I have linked up with:
- Strut Your Stuff Thursday at Somewhat Simple
- Friday Favorites at Simply Sweet Home
- Foodie Friday at Designs by Gollum
- I'm Lovin It Friday at Tidy Mom
- Tuesday Night Supper Club at Fudge Ripple
- Tempt My Tummy Tuesday at Blessed with Grace
- Hearth & Soul Hop vol. 17 at Frugality and Crunchiness with Christy
- Tuesdays at the Table at All the Small Stuff
Friday, September 24, 2010
Taco Seasoning
My husband made guac several days ago, and to eat guac, one uses tortilla chips. Well, now we are left with half a bag of tortilla chips. What is a person to do? The first thing I thought of was taco salad. I haven't had it in a while, but the parts list is pretty simple and flexible. We used tortilla chips, kidney beans, romaine lettuce, a mexican salad dressing, sauteed onions and bell peppers, sour cream and of course, ground beef.
The ground beef needed to be seasoned, that much was certain. So while scouring the internet yesterday for taco salad recipes to see if there were any parts I missed, I noticed several used taco seasoning packets. After making my own ranch dressing mix, I knew there had to be a homemade version that would be both delicious and wallet friendly.
I finally found one with superb ratings here. Let me just say right here that I really like Food.com (formerly recipezaar.com) partially because of ratings that other people like me post. Lots of people will post about any changes they made, or if the recipe was just all around horrible. I know not everybody has the same tastes, but when 20 people all comment saying they added one thing, you have to go with it. :)
I took my taco seasoning recipe to the kitchen and scaled it down to 1/4 of the original. I left all of the ratios the same except using 2 teaspoons of cumin because I was far too lazy to figure out what a quarter of 3 tablespoons was, and try to measure it with standard measuring spoons. It was still delicious, I assure you.
So, if you are one of those people that uses a lot of taco seasoning, feel free to make the whole recipe. I didn't want to use the last of the paprika in the house, so I scaled it down. Either way, it's tasty.
I feel that how much you add to ground meat is up to you too, I did about a teaspoon to almost a pound of ground beef and it was just perfect for us. You may like it kicked up a bit more. Whatever makes you happy.
3 teaspoons = 1 tablespoon 4 tablespoons = 1/4 cup
Taco Seasoning
recipe from food.com
1/2 tbl. paprika
1/2 tbl. dried onion flakes (ground down in a mortar and pestel
1 tsp. cornstarch
1 tsp. chili powder
2 tsp. ground cumin
1/4 tbl. (about 3/4 tsp) garlic powder
1/8 tsp. crushed red pepper flakes
1/4 tsp. cayenne pepper
heaping 1/4 tsp. dried oregano
1/8 tsp. coriander
Combine all of the ingredients and add as much or as little as prefered to the ground meat of your choice.
I linked this recipe up at:
- Friday Favorites at Simply Sweet Home
- Foodie Friday at Designs by Gollum
- Tuesday Night Supper Club at Fudge Ripple
- Tempt My Tummy Tuesday at Blessed with Grace
- Hearth and Soul Hop #16 at Frugality and Crunchiness with Christy
Monday, September 20, 2010
Super Easy Potato Wedges

These potato wedges can be seasoned with whatever flavors you like. It's really fun to make each potato a different flavor.
If you are only using a couple potatos, then the toaster oven makes the job even easier. I haven't tried putting any more than 2 potatoes worth of wedges in the toaster oven because you don't want the wedges to touch while baking, and my toaster oven baking pan isn't big enough for any more.
There is no frying involved, and no par-boiling the potatoes or what-have-you. Just wash, slice, mix and bake. Easy cheesy! (You could top them with some shredded cheese fresh out of the oven if you like!)

Super Easy Potato Wedges (1 potato per person)
recipe inspired by and adapted from Ina Garten
1 medium to large Russet potato per person serving
about 1 tbl. olive oil (or veggie oil) per potato
1-2 tsp desired seasonings per potato(rosemary & garlic is our favorite, but cajun is also good. It's really whatever flavors you like)
Preheat oven to 400 degrees.
Thoroughly wash your potatoes- they do grow in dirt after all. Slice them in half lengthwise and then slice each half lengthwise again into either thirds or quarters depending on how big the potato is. I like them to be about 3/4 inch thick. Thinner will cook faster and be crispier, while thicker will be more moist in the middle.
Put the potatoes in a bowl and drizzle over the oil and seasonings. Move everything around with your hands to ensure that every part of every wedge is covered. The oil you put in here is going to be what's keeping them from sticking to the pan. If you don't think there is enough oil or seasoning, just add more at this point.
Lay the wedges out on a baking sheet with cut sides down and bake for 20 minutes. Remove from the oven and flip each of them to their other cut side and bake another 10 t0 15 minutes or until they are as cooked as you prefer.
Serve warm with something to dip them in. Ranch would be good, but I like plain old ketchup. Yum!
I have linked up with:
- Recpe Swap Sunday at Remodelaholic
- Tuesdays at the Table at All the Small Stuff
- Tuesday Night Supper Club at Fudge Ripple
- Tempt My Tummy Tuesday at Blessed with Grace
- Tasty Tuesday at Balancing Beauty and Bedlam
- Hearth & Soul Blog Hop vol. 15 at Frugality and Crunchiness with Christy
Friday, September 10, 2010
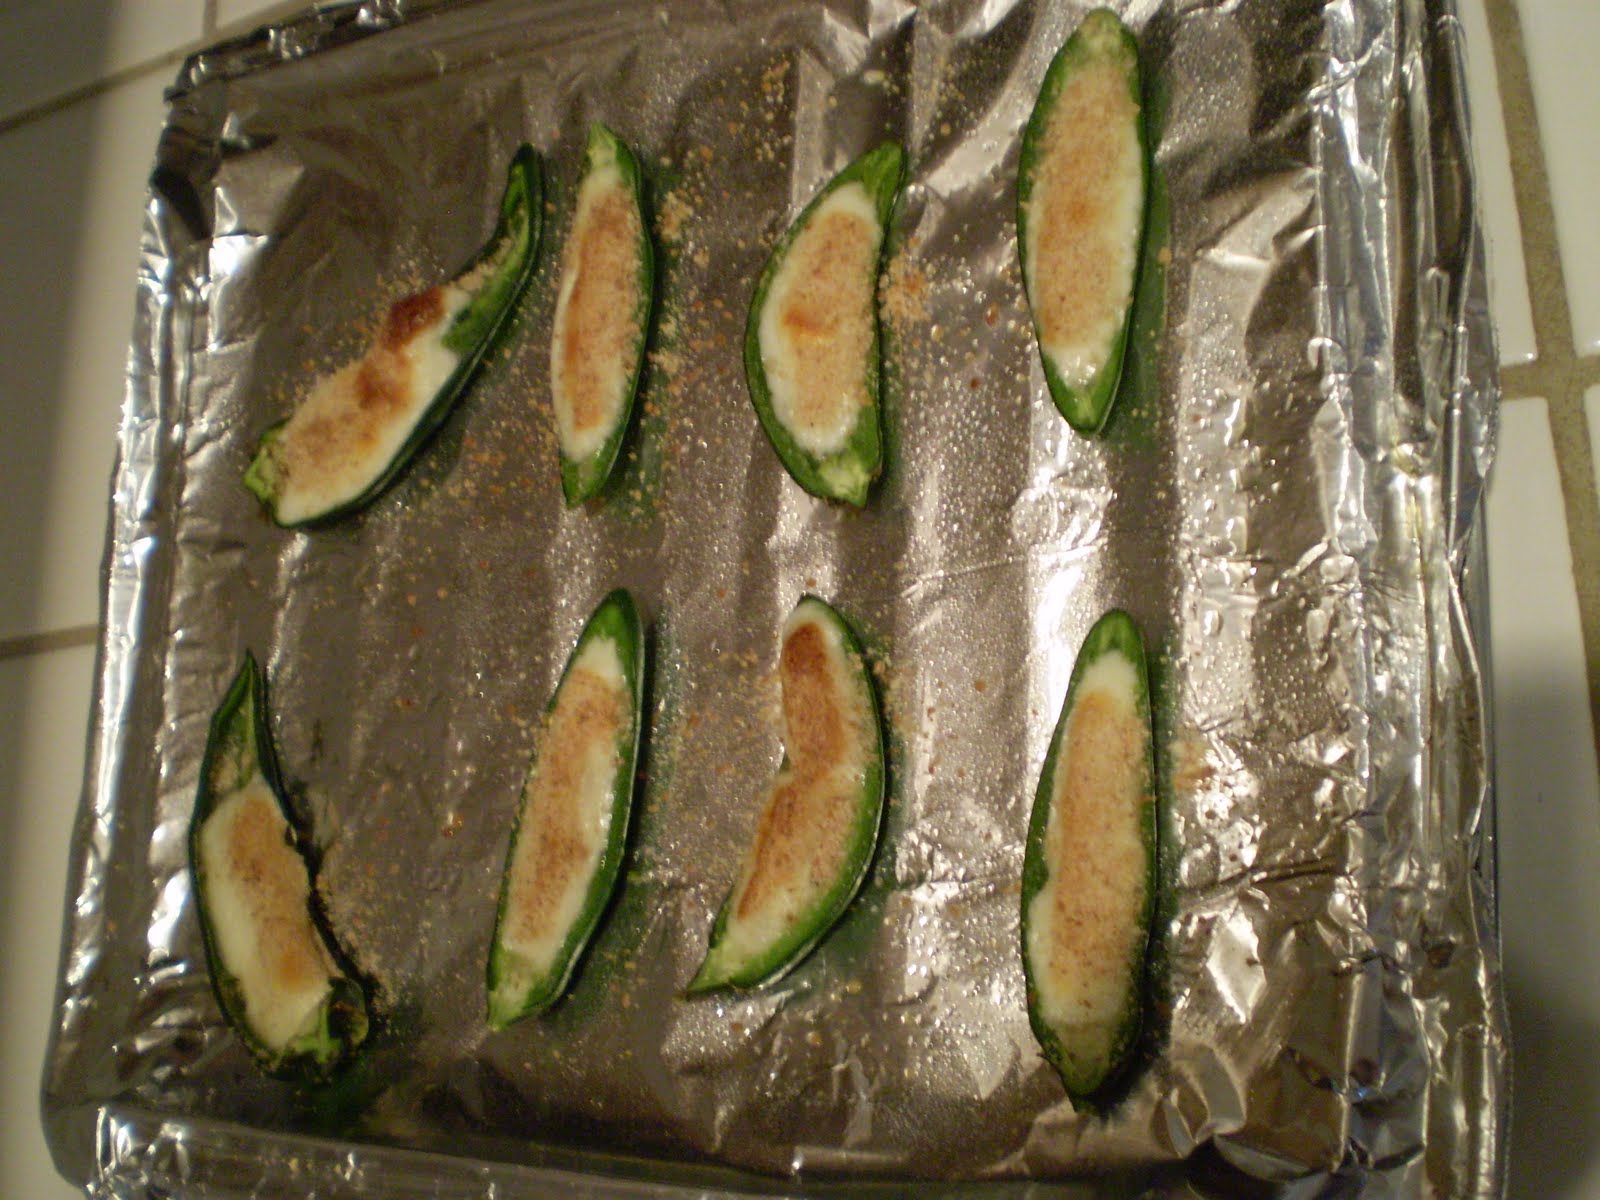
Mozzarella Stuffed Jalapenos

Well, 2 of the plants aren't producing quite like I had hoped for. Never the less, our jalapeno plant is packed full of peppers. That's where this oh so simple idea came from!!
Be careful when slicing the peppers in half and scooping ou the seeds and membrane. I used to not think much of it- not with jalapenos, then I reiceved all of the warning I will ever need. A small squirt from the pepper got into my eye. I know what pepper spray must feel like, ladies and gentleman, and it is NO GOOD! ( I plan to use gloves and safety glasses when all of my cayenne peppers are ready!)
Since this recipe is really more of a guideline, I don't have any specific measurements. Fell free to doll it up as you wish.
Mozzarella Stuffed Jalapenos
fresh jalapenos
mozzarella cheese sticks (or a small block of mozzarella)
bread crumbs (I used plain, but seasoned would be tasty)
Wash the jalapenos and slice them in half lengthwise. Using a spoon, scoop out all of the insides- its those seeds and membrane that make the pepper hot! Be careful not to flatten out the jalapeno, we need it's shape to stuff it. You can cut the top part off if you want, just to make sure all of the hot part is gone (I didn't cut the top off, so mine were pretty hot).
Take your chees stick and slice it into small strips that will fit into the jalapeno. Sprinkle some bread crumbs over the top- as much as you like. Put the peppers on a foil lined baking sheet (easy clean up!) and bake in a 350 degree oven for about 5 minutes or so, until the cheese has begun melting and the bread crumbs are sufficiently browned. Keep an eye on these, they will go quickly! Enjoy!
Note: I used my toaster oven for this and it worked PERFECTLY for something so small!
Linky parties!!!:
- Made By You Monday at Skip To My Lou
- Mouthwatering Monday at A Southern Fairytale
- Sunday Recipe Swap at Remodelaholic
- Tuesdays at the Table at All the Small Stuff
- Tuesday Night Supper Club at Fudge Ripple
- Tempt My Tummy Tuesday featured @ At the Well
- Topsy Turvy Tuesday at I'm Topsy Turvy
- Tasty Tuesday at Balancing Beauty and Bedlam
- Delicious Dishes at It's a Blog Party
- Hearth and Soul Blog Hop # 14 at Frugality and Crunchiness with Christy
Saturday, August 28, 2010
Roasted Green Beans and Onions
With our green bean plants somehow still producing, I found myself in need of a recipe. None of this just boil and eat them business. I turned first to my Taste of Home cookbook that my momma gave me for Christmas. I found the perfect recipe. (Perfect partially because I had everything on hand)
Hubby and I both really enjoyed the dish- but feel free to change it up to your taste. Don't put garlic in if you don't like it. Add more onion if you love the stuff. You get my drift.

Roasted Green Beans and Onions about 4 servings
(adapted from a recipe in Taste of Home)
3/4- 1 lb of green beans, ends snapped off and washed
1 small onion, thinly sliced into rings (or half rings if you're like me)
2 garlic cloves, sliced thin
1 tbl. red wine vinegar
1 tbl. olive oil
Preheat oven to 450 degrees. (I used my toaster oven here)
Bring a pot of water to a boil and blanch the beans for approx. 5 minutes or so. Their color will become more pronounced, but still be firm. Drain.
In a medium sized bowl, combine the beans with the remaining ingredients and mix until everything is covered in oil and vinegar. Place on a greased baking dish. Spread out a little bit- too much spreading and things will burn quickly.
Bake for 10 minutes and check. If you want it more cooked, stir and pop back in the oven for another 5 minutes of so. After 10 minutes, the beans and onions were plenty cooked for my taste. Enjoy!
I have linked up this delicious recipe at:
- Sunday Recipe Swap at Remodelaholic
- Potluck Sunday at Mommy's Kitchen
- Mouthwatering Monday at A Southern Fairytale
- Tuesdays at the Table at All the Small Stuff
- Tuesday Night Supper Club at Fudge Ripple
- Tempt My Tummy Tuesday at Blessed with Grace
- Topsy Turvy Tuesday at I'm Topsy Turvy
- Tasty Tuesday at Balancing Beauty and Bedlam
- Delicious Dishes at It's a Blog Party
Monday, August 23, 2010
Cocoa Meringues

Remember that creme brulee I made? Remember how it doesn't use egg whites?
The more I get into "fancy" type desserts- custards and such, the more egg whites I end up with on hand. What does a girl do with extra egg whites? Try another meringue cookie recipe, of course!!
These cookies are chocolately, light, and not that bad for you either! Everybody that tried them liked them. And in a sealed container- they were still good a couple days later.

Cocoa Meringues
3 egg whites
3/8 tsp. cream of tartar
dash of salt
1/4 c. + 2 tbl. granulated sugar
1/2 tsp. vanilla extract
1/4 c. + 2 tbl. powdered sugar
3 tbl. unsweetened cocoa
Preheat oven to 200 degrees and line a cookie sheet with parchment paper.
In a large bowl, beat together the egg whites, cream of tartar and salt with a whisk or balloon whisk attatchment of a stand mixer. Beat until soft peaks have formed, then slowly add in the granlulated sugar while still beating. Continue beating the egg whites until stiff and glossy peaks have formed. Keep an eye on this to make sure they aren't overbeaten!
Sift together the powdered sugar and cocoa powder, then fold into the egg whites along with the vanilla extract. Drop the meringue on the cookie sheet by large teaspoonfuls. (Alternatively, you can load up the meringue into a piping bag with a larger tip and pipe the meringue onto the cookie sheet.) Bake for 1 1/2 hours (90 minutes) and then turn off the oven, leaving the cookies inside to cool for at least 3 hours or up to overnight if you baked them in the evening. After cooling, store the cookies in an airtight container to keep them as fresh as possible and enjoy!I have linked up at the following parties:
- Tuesdays at the Table at All The Small Stuff
- Tuesday Night Supper Club at Fudge Ripple
- Tempt My Tummy Tuesday at Blessed with Grace
- Tuesday Tastes at Crazy Daisy
- Two for Tuesday #11 at Frugality and Crunchiness with Christy
- Topsy Turvy Tuesday at I'm Topsy Turvy
- Tasty Tuesday at Balancing Beauty and Bedlam
- Delicious Dishes at It's a Blog Party
Monday, August 16, 2010
Creme Brulee
Can you believe that I never had creme brulee until just earlier this year? A couple friends of mine are big fans of it, and when we learned it was the dessert special of the night at the restaurant we met at for dinner, there was no getting around having some! It was delicious.Creme brulee is decadent, smooth and just plain fun. The crystalized sugar layer on top is fun to gently tap, then to crack to get to the lovely custard beneath.
Next time hubby and I had dinner with these friends we all four walked to the grocery store and bought creme brulee ice cream. Also delicious. I had to try making it sometime. The creme brulee, not the ice cream.
Alas, I don't have one of those spiffy hand-held torch things that you caramelize the sugar with. I have heard of people using their broilers, but that doesn't sound fun or ideal. It was then that the hubby tells me he has a welding torch. Nothing huge, but certainly bigger than the little hand held ones at the cooking stores. Perfect!
The recipe was a lot easier than I hoped for. With only a few ingredients- the only thing that really matters is following directions. The outcome is very tasty. Very very tasty. We had those creme brulee loving friends over again and I made this recipe for them. What a hit. Everybody loved it. Yum!
Unfortunately, I didn't take any pictures- but a quick internet search would surely give you plenty of ideas.
I used Alton Brown's recipe- and found that it makes more than he says. (That or I give smaller portions?) Anyway- I half his recipe and it makes 4, instead of the 3 it should. Whatever. Hubby then cooks the sugar layer on top and it's done! Alton would be proud that we used the welding torch- not buying a uni-tasker! Hehe.
Creme Brulee serves 4
(adapted from Alton Brown)
2 c. heavy cream
1 vanilla bean, split and the insides removed
1/4 c. sugar (vanilla sugar if you got it) + more for topping them
3 egg yolks (use the whites to make meringue cookies!)
hot water
Heat the heavy cream and the vanilla bean (and insides) in a saucepan over medium high heat and just bring to a boil. Remove from heat and let sit for about 15 minutes. Remove the bean and discard (or rinse off, allow to dry and stick in a containter of sugar to create vanilla sugar)
Preheat oven to 325 degrees.
In a medium sized bowl, whisk together the 1/4 c of sugar and the egg yolks until the sugar is fully incorporated and the yolks begin to lighten in color just a tad.
Slowly pour the cream into the yolk mixture, whisking constantly as you go to prevent scrambled eggs from forming. We want dessert here, not breakfast. Pour your liquid into four 7-8 oz. ramekins and set those ramekins into a cake pan or roasting pan and fill the roasting pan (not the ramekins!!!) with enough hot water to just come halfway up the sides of the ramekins. Bake for 40-45 minutes. The costard will still tremble and wiggle a bit in the middle- that's just fine.
Remove ramekins from the water bath and refrigerate until comepletely cool- a few hours to overnight.
Alton says to take the creme brulee out of the fridge 30 minutes before you want to serve. I usually forgot to, and it worked out just fine. Right before serving, sprinkle with a couple tablespoons of sugar and shake slightly to spread the sugar into an even layer. Safely using a torch (or your broiler), caramelize the sugar on top until nice and browned and bubbly. Let sit for a minute for the sugar to harden. Serve and enjoy!!
Linked up at:
- Made by You Monday at Skip to My Lou
- Mouthwatering Monday at A Southern Fairytale
- Market Yourself Monday at Sumo's Sweet Stuff
- Topsy Turvy Tuesday at I'm Topsy Turvy
- Tuesday Night Supper Club at Fudge Ripple
- Tempt My Tummy Tuesday at Blessed with Grace
- Tuesday Tastes at Crazy Daisy
- Tasty Tuesday at Balancing Beauty and Bedlam
- Delicious Dishes at It's a Blog Party
- Two For Tuesdays at Frugality and Crunchiness with Christy
- Foodie Friday at Designs by Gollum
Monday, August 9, 2010
Sweet Roasted Tomatoes

This poses an interesting challenge for me. What all can I incorporate tomatoes in besides sauces? And, is it possible to have a side dish of just tomatoes, prepared somehow? Yes.
With a bunch of roma tomatoes in need of being eaten, I went to foodnetwork.com. I remember seeing on there a recipe that involves roasted veggies tossed in pasta. Tomatoes must have their own recipe somewhere as the star, right? Yes! Ina Garten has a delicious recipe for roasted tomatoes posted.

I made a few changes to the recipe to suit my needs. Feel free to look back at Ina's version as well as mine and prepare how you wish!

Sweet Roasted Tomatoes serves: about 4
12 roma tomatoes, halved lengthwise, cored and seeds removed (easy to do with a spoon)
2-4 tbl. olive oil
1-2 tbl. balsamic vinegar
1/2-1 tsp. garlic powder
1-2 tsp. sugar
salt & pepper
Preheat oven to 425 degrees.
Arrange the tomatoes, cut side up on a baking sheet, in one layer. Drizzle olive oil over tomatoes. You may not need all 4 tbl, it really depends on how big your tomatoes are.
Drizzle balsamic vinegar over the tomatoes. Then sprinkle the garlic powder and sugar over the tomatoes, and as mush salt and pepper as you like.
Bake for 25 minutes. (I used my toaster oven and it worked perfectly) The tomatoes will flatten out and look burned- but that's just the balsamic vinegar, don't worry. Serve warm or at room temperature.
I have linked up here:
- Mommy's Kitchen
- Made by You Monday at Skip to my Lou
- Just Something I Whipped Up at The Girl Creative
- It's Party Time Thursday at Pony Tails & Fish Scales
- Friday Favorites at Simply Sweet Home
- I'm Lovin It at Tidy Mom
- Foodie Friday at Designs by Gollum
Monday, August 2, 2010
Thai Green Curry Chicken

But I wanted to try making green curry like I have had in Thai restaurants. It's delicious. Before going to the store, I did what I always do when getting ready to attempt a dish I'm not familiar with- google it. I looked at lots of recipes. But I secretly hoped that the jar of green curry paste at the store would have a recipe. Lots of brands these days have recipes utlizing their products printed on the product or at a website. This was just the case when I found Thai Kitchens green curry paste. There was an oh so simple recipe printed on the jar. Armed with the paste. fish sauce and a can of coconut milk, I headed home.
When I got home, I decided to check out the vendors website. Low and behold, there were lots more recipes there. I ended up doing a mix between the recipe on the curry paste jar and this one.
The final dish was amazing. I thought it tasted just perfect. Hubby didn't care for the jasmine rice it's served on- so next time I'll make some plain rice for him. I feel so much less threatened by Asian cuisine now!
I know I bought the curry paste. But do you know what all is in that stuff? Lots of things I have never seen at my local grocery store, that's for sure. (lemongrass, galangal, and certain chilis just to start) Plus- I wouldn't know how much of what to put in. The premade curry paste is such an easier alternative. Delicious too. :)
*note* The amount of fish sauce and curry paste you will need may vary depending on the brand you choose, as well as the potency desired. Start will a low amount- you can always add more.

Thai Green Curry Chicken serves 4
(adapted from Thai Kitchens)
1 14oz can coconut milk (I used lowfat)
1/3 c. chicken stock
1/4 c. julienned fresh basil leaves
2 tbl. fish sauce (Thai Kitchen brand)
1 tbl. green curry paste (Thai Kitchen brand)
2 tbl. brown sugar
1/2 red bell pepper, chopped into 1 inch pieces
1 large (or 2 small) carrots, sliced into 1/2 inch pieces
1 medium onion, cut into 1 inch pieces
1/2 c. frozen or fresh peas (optional)
1-2 chicken breasts, cut into bite sized pieces.
Jasmine rice
Mix together the coconut milk, chicken stock, basil, fish sauce, curry paste and brown sugar in a large saucepan. Bring the mixture to a boil over medium-high heat, then reduce down to low and simmer for 10 minutes.
Add in the chicken and all of the vegetables (whatever combination of veggies you prefer). Simmer the whole mixture over low/medium-low heat until the chicken is cooked through and the carrots are tender. About 10-15 minutes.
Serve over rice. Enjoy!
I have linked up this tasty recipe at:
- Tuesdays at the Table at All the Small Stuff
- Tasty Tuesday at Balancing Beauty and Bedlam
- Tempt My Tummy Tuesday at Blessed with Grace
- Topsy Turvy Tuesday at I'm Topsy Turvy
- Delicious Dishes at It's a Blog Party
- Tuesday Night Supper Club at Fudge Ripple
- Strut Your Stuff at Somewhat Simple
- It's Party Time Thursday at Ponytails & Fish Scales
- Foodie Friday at Designs by Gollum
- I'm Lovin It at Tidy Mom
- Friday Favorites at Simply Sweet Home
Wednesday, July 28, 2010
Mushroom Orzo

Hubby doesn't feel the same way. And that's just fine with me. I just add them here and there to my food and everybody is happy.
And then I found a Tasty Kitchen recipe for Creamy Mushroom Orzo and wanted to try it. Having never cooked with orzo prior to this recipe, it definitely intrigued me.
I followed the recipe almost exactly the first time. The only change I made was substituting more chicken broth for the wine. When do I ever seem to follow a recipe the whole way through the first time? Okay- maybe with breads. Anyways.
The dish was very tasty. I felt that it needed a higher mushroom to orzo ratio, though. So next time, and subsequent times afterward, I continue to add much more mushrooms.
The verdict? Even hubby likes this dish. It makes a great side to just about anything. It can serve about 6- but we usually just finish the whole pan ourselves. :)
Another little thing I love about this dish is that you add all of the liquid to the pan that you need to cook the orzo. None of this boiling it then draining it business. Which is ideal since I don't have a sieve, and don't want to use a bunch of cheesecloth everytime I want orzo.

Mushroom Orzo serves 6
adapted from Tasty Kitchen
2 slices of bacon
1 small onion, chopped
1 1/2 c. sliced mushrooms
1/2 c. uncooked orzo
1 clove garlic, minced
2 tbl. butter
1 can chicken broth (I prefer reduced sodium)
salt & pepper to taste
Cook the bacon in a medium sized frying pan until done. Remove and reserve. (Or just eat while cooking the rest of the dish). You should have about 2 tbl. of grease; if not, add some oil or butter.
Over medium heat, cook the onions and mushrooms in the bacon grease until the mushrooms soften and t he onions start to become translucent. Add in the orzo, garlic and butter. Stir around until the butter has melted and the orzo is completely mixed in and coated.
Pour the can of chicken broth in the pan and bring to a boil. Reduce the heat a bit and simmer until the liquid has been sucked up and the orzo is soft. There may be a little liquid still in the pan, but after the heat is turned off and the pan sits, the liquid will soon be no more. Season with salt and pepper to your taste and enjoy!
I linked up this tasty recipe at:
- July's Side Dish Showdown at Cinnamon Spice & Everything Nice
- Strut Your Stuff Thursday at Somewhat Simple
- It's Party Time Thursday at Ponytails & Fish Scales
- Foodie Friday at Designs by Gollum
- Friday Favorites at Simply Sweet Home
- I'm Lovin It at TidyMom
- Mouthwatering Monday at A Southern Fairytale
- Tuesdays at the Table at All the Small Stuff
- Two for Tuesday vol. 8 at Frugality and Crunchiness with Christy
- Tuesday Night Supper Club at Fudge Ripple
Subscribe to:
Posts (Atom)


